ARTIFICIAL INTELLIGENCE, DATA & ANALYTICS
BESPOKE DATA VISUALISATIONS
AI ADOPTION SOLUTIONS
CUSTOM SOFTWARE DEVELOPMENT
CLOUD & OPERATIONS
EMBEDDED SOFTWARE
IOT, CLOUD, DELIVERY & ENABLEMENT
Zephyr OS is a tool that has gained significant popularity among embedded systems developers – and for good reason. Its lightweight design, scalability, and support for diverse hardware architectures make it a perfect choice for projects requiring efficiency and reliability. Engineers working on IoT devices, industrial automation systems, and consumer electronics frequently turn to Zephyr to meet their needs. In this article, you’ll learn how to set up a development environment, compile Zephyr OS, deploy it on the Nucleo-F413ZH platform, and debug embedded applications effectively. By following this guide, you’ll be well-equipped to start leveraging Zephyr OS in your own projects.
Designed with resource-constrained devices in mind, Zephyr OS is a modern, open-source real-time operating system. It offers a lightweight, scalable, and highly configurable platform, making it an excellent choice for a wide range of embedded applications, including:
Zephyr OS stands out due to its focus on efficiency and scalability. It is optimized for low-power devices with limited computational and memory resources. The operating system supports multi-architecture implementations, enabling it to run on a variety of processor architectures such as ARM, x86, RISC-V, and MIPS, making it highly adaptable across different hardware platforms.
Thanks to its versatility and robust features, this RTOS has found applications in various industries, including:
With its robust feature set, cross-platform compatibility, and active open-source community, Zephyr OS is an ideal choice for developers seeking reliable RTOS for modern embedded applications.
For more information, visit the official Zephyr OS project website.
For the purposes of this article, we will be using the NUCLEO-F413ZH development board. This board features an STM32F413ZHT6U microcontroller, based on the ARM Cortex-M4 architecture, with 1.5MB of Flash memory and 320KB of RAM.
Key onboard components include:
Zephyr OS can be built and run on all major operating systems, including Linux, macOS, and Windows. However, this article focuses on setting up and building Zephyr OS on the Linux Mint distribution, providing step-by-step guidance for installation and configuration.
Before proceeding, it is essential to install the necessary development tools and dependencies. The following command will install all required packages on a Linux Mint system:
$ sudo apt-get install –no-install-recommends git cmake ninja-build gperf ccache dfu-util device-tree-compiler wget python3-dev python3-pip python3-setuptools python3-tk python3-wheel python3-venv xz-utils file make gcc gcc-multilib g++-multilib libsdl2-dev libmagic1
This command ensures that all required build tools, compilers, and dependencies are available for Zephyr OS development.
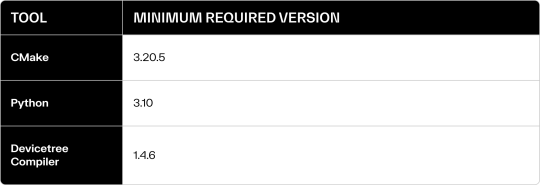
Before continuing with the Zephyr OS setup, it is important to verify that the installed versions of critical tools such as CMake, Devicetree Compiler (DTC), and Python meet the minimum required versions listed in the table below:
To check the currently installed versions, run the following commands in the terminal:
$ cmake –version
$ dtc –version
$ python3 –version
If any of these tools are outdated, they must be updated to ensure compatibility with Zephyr OS and avoid potential build issues.
Zephyr OS relies on a Python virtual environment to establish an encapsulated workspace specifically configured for the build process.
A virtual environment provides isolation from the system-wide Python installation, allowing you to install project-specific libraries and dependencies without interfering with other projects or the global environment. This ensures a clean and reproducible development setup.
To create a new virtual environment for Zephyr OS, execute the following command:
$ python -m venv ~/zephyrproject/.venv
Upon execution, all necessary files and directories required for the virtual environment will be generated within the ~/zephyrproject/.venv directory. Inside this environment, package management tools such as pip can be used to install dependencies, ensuring that all installed packages remain confined to the virtual environment.
Once the virtual environment has been created, it must be activated using the command:
$ source ~/zephyrproject/.venv/bin/activate
After activation, the shell prompt will be prefixed with (.venv), indicating that the virtual environment is active.
While the virtual environment is active, all Python-related operations, including package installations and script executions, will use the isolated environment, ensuring consistency and avoiding conflicts with the system environment.
To deactivate the virtual environment at any time, simply run the following command:
(.venv) $ deactivate
Note: It is essential to activate the virtual environment each time you start working on the project to ensure the correct dependencies and settings are used.
In the Zephyr OS ecosystem, West is a powerful command-line and meta-tooling system designed to facilitate project management, streamline development workflows, and handle multi-repository dependencies. Inspired by Google’s Repo tool and Git submodules, West is particularly beneficial in Zephyr’s modular architecture, where the core Zephyr repository often relies on external repositories for libraries, drivers, and additional components.
To install West, execute the following command:
(.venv) $ pip install west
Once the Python virtual environment is set up and West is installed, the next step is to initialize the Zephyr OS project by running:
(.venv) $ cd ~/zephyrproject
(.venv) $ west init .
(.venv) $ west update
The above commands perform the following actions:
This ensures that the Zephyr environment is correctly configured and up to date with the necessary dependencies.
Zephyr OS leverages CMake for project configuration and build processes. In order for CMake to locate Zephyr’s components, environment variables need to be properly set. This is accomplished by running the following command:
(.venv) $ west zephyr-export
Executing this command adds Zephyr’s paths to the CMake user package registry, typically located in ~/.cmake/packages/*, enabling seamless discovery of Zephyr libraries and configurations.
To ensure that all necessary Python packages required by Zephyr are installed, use the command:
(.venv) $ west packages pip –install
This will install any Python-based dependencies specified in the Zephyr environment, ensuring a fully functional development setup.
The Zephyr Software Development Kit (SDK) provides precompiled toolchains for Zephyr’s supported architectures. It includes essential tools such as a compiler, assembler, linker, and other utilities required to build and deploy Zephyr applications.
To install the Zephyr SDK, execute:
(.venv) west sdk install
Once the SDK is installed, developers can efficiently create, compile, and deploy Zephyr applications across various target hardware platforms, streamlining the embedded development process.
Before initiating the build process, it is essential to determine the appropriate board configuration that West will utilize. According to the official Zephyr OS documentation, the board configuration string for the Nucleo-F413ZH development board is: nucleo_f413zh.
This board identifier must be specified during every build command. However, to simplify the process and avoid repetitive manual input, the default board configuration can be set using the following command:
(.venv) west config build.board nucleo_f413zh
By executing this command, West will automatically use the Nucleo-F413ZH board configuration for all subsequent build operations, streamlining the development workflow.
With the development environment configured, we are now ready to build an example application. Zephyr provides a bunch of example applications, one of them is “blinky” which toggles the onboard LED at regular intervals.
The source code for the “blinky” example application can be found in the Zephyr repository under the directory samples/basic/blinky. This directory contains all necessary source files, configuration settings, and build scripts required to compile and deploy the application on supported hardware platforms.
To compile the “blinky” application for the Nucleo-F413ZH board, run the following command:
(.venv) west build -p always -b nucleo_f413zh samples/basic/blinky
Explanation of the build command:
Upon successful compilation, the output binary will be generated and can be flashed onto the board for testing.
To flash the compiled output file onto the board’s internal memory, the west flash command is typically used. By default, for STM32-based boards, Zephyr utilizes the STM32 Cube CLI programmer to handle the flashing process. However, if you prefer not to use the default method, you can opt for an alternative, such as OpenOCD (Open On-Chip Debugger).
To flash the hex file using OpenOCD, simply specify it as the –runner argument in the west flash command:
(.venv) west flash –runner openocd
Once this command is executed, you should observe the onboard LED blinking, indicating that the application has been successfully flashed onto the Nucleo board.
Effective debugging is a crucial aspect of embedded system development, enabling developers to identify and resolve issues within their applications efficiently. Zephyr OS provides robust debugging capabilities through OpenOCD (Open On-Chip Debugger), which facilitates communication between the host machine and the target microcontroller.
To debug a Zephyr application, two terminal windows are required:
In the first terminal, execute the following command to start the GDB server, which enables communication between GDB and the target board:
(.venv) $ west debugserver
This command initializes OpenOCD, connects to the target hardware via the on-board debugger (e.g., ST-LINK, J-Link), and prepares the system for remote debugging. Once successfully launched, the output should indicate that the server is waiting for an incoming GDB connection.
In the second terminal, run the following command to start the GDB client:
(.venv) $ west debug
The west debug command launches GDB and automatically connects it to the running debug server. This setup allows for full control of the application, including features such as:
The output should confirm that GDB has connected to the target via the OpenOCD server.
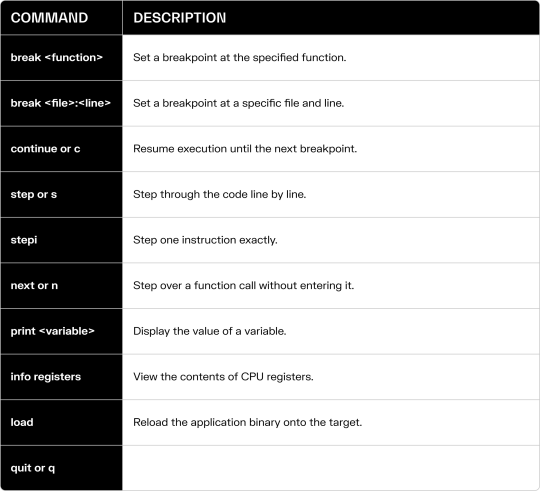
After the GDB client connects, you can use standard GDB commands to interact with your Zephyr application. Some commonly used commands include:
To illustrate a typical debugging workflow, consider the following example:
1. Set a breakpoint at the `gpio_pin_toggle_dt()` function:
(gdb) break gpio_pin_toggle_dt
2. Run the application:
(gdb) continue
3. Step through initialization code line by line:
(gdb) step
4. Step over a function call without entering it.
(gdb) next
5. Inspect the value of a variable named `led_state`:
(gdb) print led_state
6. Resume program execution:
(gdb) continue
With each execution of the continue command, the LED will toggle its state between ON and OFF.
Zephyr OS provides several debugging aids that can enhance the debugging process:
(gdb) info threads
If you encounter problems while debugging, consider the following solutions:
1. “No target device found” error:
2. GDB connection timeout:
3. Code not stopping at breakpoints:
Now that we have a working setup, let’s experiment with a minor modification to the existing example implementation.
The Nucleo development board includes three user LEDs: red, green, and blue. The default implementation of the ‘Blinky’ example uses the green LED. We will modify the example to use the blue LED instead of the green one.
Below is a code snippet defining the macro and a global variable used in the example:
/* The devicetree node identifier for the “led0” alias. */
#define LED0_NODE DT_ALIAS(led0)
/*
* A build error on this line means your board is unsupported.
* See the sample documentation for information on how to fix this.
*/
static const struct gpio_dt_spec led = GPIO_DT_SPEC_GET(LED0_NODE, gpios);
Additionally, here is a fragment of code responsible for toggling the state of the LED:
ret = gpio_pin_toggle_dt(&led);
The source code does not explicitly specify the GPIO pin for led0 or indicate which of the eight GPIO banks connects to the LED. Instead, Zephyr OS leverages a hardware description mechanism called the Device Tree.
Device Tree (DT) files play a crucial role in describing the hardware configuration of embedded systems. They provide the operating system with information about the hardware it runs on, enabling the system to function across different hardware platforms without requiring modifications to the kernel code. This structured data approach, widely used in embedded systems and Linux kernels, abstracts hardware details from the kernel, promoting portability and scalability.
For the Nucleo F413ZH development board, the hardware configuration is defined in the nucleo_f413zh.dts file. Let’s examine a relevant excerpt from this configuration file:
leds: leds {
compatible = “gpio-leds”;
green_led_1: led_1 {
gpios = <&gpiob 0 GPIO_ACTIVE_HIGH>;
label = “User LD1”;
};
blue_led_1: led_2 {
gpios = <&gpiob 7 GPIO_ACTIVE_HIGH>;
label = “User LD2”;
};
red_led_1: led_3 {
gpios = <&gpiob 14 GPIO_ACTIVE_HIGH>;
label = “User LD3”;
};
};
aliases {
led0 = &green_led_1;
led1 = &blue_led_1;
led2 = &red_led_1;
};
The configuration indicates that the board has three LEDs defined in the leds node. Each LED node specifies its GPIO configuration through the gpios property. This property contains three values:
In above configuration We can read:
1. Green LED (green_led_1):
2. Blue LED (blue_led_1):
3. Red LED (red_led_1):
The aliases node maps user-friendly names to specific LED nodes:
Aliases simplify code readability and maintainability, especially in driver development or system configuration. For instance, in the provided C code, `led0` is used to control the green LED.
To change the LED controlled by the code, you only need to update the alias used in the macro definition. For example, if you want to toggle the blue LED instead of the green LED, modify the macro as follows:
#define LED0_NODE DT_ALIAS(led1)
After making this change, recompile and flash the firmware. The blue LED will now blink instead of the green LED.
While the Device Tree describes hardware configurations, Kconfig allows developers to tailor a platform to specific application needs. According to the ZephyrOS documentation:
“The Zephyr kernel and subsystems can be configured at build time to adapt them for specific application and platform needs. Configuration is handled through Kconfig, which is the same configuration system used by the Linux kernel. The goal is to support configuration without having to change any source code.”
This system provides a flexible way to enable, disable, or customize features in ZephyrOS and its applications.
Let’s revisit the blinking LED example. In addition to toggling the LED state, the code includes a printf function call that outputs the LED status (on or off) via the UART serial port:
printf(“LED state: %s\n”, led_state ? “ON” : “OFF”);
This output is transmitted through the UART serial interface. By connecting a USB-to-UART adapter to a computer, you can receive these messages, as shown below:
You can disable the UART communication system through Kconfig by modifying specific configuration symbols.
The default configuration for the Nucleo F413ZH board is defined in the nucleo_f413zh_defconfig file. Within this file, the following entries enable console communication via UART:
# console
CONFIG_CONSOLE=y
CONFIG_UART_CONSOLE=y
These entries show that the console and UART console features are enabled.
The prj.conf file in the project directory enables or disables specific Kconfig options. This file allows developers to control various ZephyrOS features, such as drivers, network protocols, and memory settings, to suit the requirements of a particular application.
To disable the UART console, add the following lines to the prj.conf file:
CONFIG_CONSOLE=n
CONFIG_UART_CONSOLE=n
After adding these entries, rebuild and flash the firmware to the board. The board will stop sending LED status messages over the UART serial port, effectively disabling the console output.
Zephyr OS is an excellent platform for creating modern, energy-efficient, and secure embedded devices. Its flexibility and strong community support have made it a go-to solution for many projects. The system is straightforward to set up, use, and develop across various boards, making it particularly suitable for applications requiring precise, deterministic task execution times.
With the Device Tree, Zephyr abstracts hardware details from application code, enabling developers to adjust hardware behavior without modifying the core logic. This not only simplifies maintenance but also ensures portability across a wide range of hardware platforms.
Kconfig adds another layer of flexibility by allowing developers to customize Zephyr OS at build time without changing the source code. For instance, this article demonstrates how disabling the UART console via the prj.conf file easily tailors the system to specific application requirements. This mechanism helps optimize resource usage and adapt Zephyr OS to efficiently handle diverse use cases.
DARIUSZ IWANOCZKO
Senior Embedded Software Engineer, Holisticon Connect
At Holisticon Connect, our core values of Passion and Execution drive us toward a Promising Future. We are a hands-on tech company that places people at the centre of everything we do. Specialising in Custom Software Development, Cloud and Operations, Bespoke Data Visualisations, Engineering & Embedded services, we build trust through our promise to deliver and a no-drama approach. We are committed to delivering reliable and effective solutions, ensuring our clients can count on us to meet their needs with integrity and excellence.